Thursday, April 13, 2017

Shuttle talk

Finding the shuttle that's 'just right'

Schacht end-feed shuttle w/tension device
First there were LeClerc boat shuttles with bobbins and paper quills, mainly because my first loom was a LeClerc. More recently, along came a Bluster Bay traditional end-feed boat shuttle with hook-and-eye tensioner. Then came an Ahrehns & Violette (now Chico, Calif.-based AVL) end-feed tensioned shuttle along with the AVL 12-shaft dobby loom. 


Above: AVL tensioned end feed shuttle. ca.1981 w/pirns
Below: Boat shuttle w/paper quill
I was recently weaving cotton towels for a guild project on the new dobby loom. As I was evaluating the loom, I also began experimenting with the two end-feed shuttles. The 15" AVL, which was almost certainly made for the loom (They share the same inventory number from FIT), works beautifully, but feels too big and too heavy in my hand and for the 34' dobby loom. 


Above: Bluster Bay end-feed shuttle w/hooks and eye
Below: Boat shuttle with bobbin
I swapped out the AVL shuttle for the 11" Bluster Bay shuttle. Nice. These are beautiful shuttles. The quality of workmanship is excellent and they are a pleasure to work with. But I found threading the hooks and eye very fiddly and hard to replicate if I lost the end of the prior pirn's thread. Its size also felt a tad small, but the difference in weight  with the AVL may have contributed to that conclusion. (See weight comparisons below.)

I was using two colors for some of the towels and that gave me a good opportunity to evaluate the shuttles against each other. 

Ideally, I'd want two shuttles of the same weight and balance for a project--and the end-feed shuttles I had were too different to pair. So, I tried using a traditional boat shuttle and bobbin with the Bluster Bay, only to be reminded how much I hated the rolling bobbins that either pay out excess weft or hold onto it so tightly it pulls the selvedge too often. A paper quill was better, but couldn't replicate the selvedges of the Bluster Bay. 

I longed for the 'just right' end-feed shuttle.


Path to purchase

I had purchased my first end-feed shuttle--the Bluster Bay--at a conference on recommendations from others, but hadn't really researched available products. I love the shuttle, but cost is always a consideration. Much as I love working with the elegant shuttle, the cost for shuttle with a metal tensioning device is one-third to one-half again the cost of other brands. 

I needed more information. I weighed my shuttles--with and without pirns--and collected  specifications for end-feed shuttles with metal tensioning devices on the market. Then I  consulted with weavers on Weavolution, where there had been a lengthy discussion a few years ago on the topic. 
Schacht end-feed tensioning device, detail
After listening to what others had to say about their experiences, I balanced what I needed against cost. I bought a 12 inch Schacht end-feed shuttle.

I have been using my new shuttle and I love it. It's not as beautiful in the hand, but i's a snap to thread (no hook needed!) and the metal tensioning  pads are easily adjustable. 

No, I don't have a matched pair, but the Bluster Bay and the Schacht work pretty well together. At least for now. 


And now I have only myself to blame if my selvedges are less than nice.


Here are some specs used in my decision-making process. 
Specifications
Ahrehns & Violette 
(Chico, California)
Bluster Bay
(Sandpoint, Idaho)
Schacht
(Boulder, Colorado)
Length 15 inches 11 inches 12 inches
Type pirn Wood Cardboard Wood
Weight (with/without pirn) 7.8 oz/5.8 oz 3.7 oz/3.8 oz 4.8 oz/5.4 oz
Tension type Metal tensioning pads Hook and Eye Metal tensioning pads

Note: End-feed shuttles require pirns to match. 
Wednesday, April 5, 2017

Sharing love of fiber


Tabby, kilim slits, rya knots, and
shaping techniques

Teaching as an art form 

Although the subjects have varied over the years, the rewards of sharing knowledge never cease to give me joy. Thanks to The ARTerya new arts-focused business that has just opened in Medford village, I am now looking forward to sharing my love of threads.

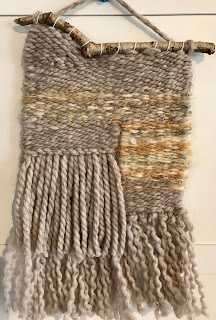
One of my classes will focus on weaving a small wall hanging. Participants will learn basic tapestry techniques and leave with a unique 'wall art' ready to hang.

The classes, which are project-oriented, target those with interest, but with little to no knowledge or experience. As it's a near certainty that prospective students don't have equipment, the challenge is to get people interested with an inexpensive cost of entry.

In this case, the goal was to find an inexpensive table/lap loom. And The ARTery owner, Karen Walker, did just that! But before I taught with it, I wanted to work with it--find what it would do and what are its limitations. I ordered one from Target. 
Two types of dovetails with roving for dimension

The only real issue with it is that it needs glued together for stability. Another potential downside is that beginning weavers may be confused with two sets of visible threads as the loom is constructed to be warped around the loom length. (I'll take some cardboard to insert in the middle of the loom to cut down on distraction for new weavers.)

Glued up and ready to play

And play, I did. I had a ball! My goal was to develop projects that were easy to do and could be completed in two sessions--but varied enough to give people ideas. The yarns had to be forgiving and the techniques restricted to just a few simple processes. In addition to tabby, I wove examples with interlocking dovetail joins, kilim slits, rya knots, shaping and fringes.

The ARTery's grand opening is Saturday. The weavings are there now and I do look forward to teaching there!
Simple two-color tabby techniques
Variegated yarn effects