Wednesday, June 29, 2016

Hands, machines and technology

When fabrics combine hand, machine and technology

Iris van Herpen, 2012. 3-D printed epoxy
If you like the many faces of fabric, get thee to the Met before The Costume Institute's spring 2016 exhibition, Manus x Machina: Fashion in an Age of Technology  closes because it's a stunner.

The show is full of beautiful objects, but its focus is on  how fashion designers have embraced machines and technology to create new works. Almost all designs are  from the early 20th century to the present. The exception is an 1870 Irish crocheted wedding dress.

Ranging from haute couture to prêt-à-porter, some of the works are very avant-garde--and barely wearable. Like the cast fiberglass 'statement' dress that releases maple-seed-like elements by remote control. But the majority of the 170 ensembles are not only very wearable, but elegant and timeless. 
Iris van Herpen dress, 2013-14.

Fabric meets technology

Gareth Pugh, 2015-16.
Dutch designer Iris van Herben's haute couture dresses stand out as examples of harnessed technology--and you don't need to like them to appreciate their creativity. One of her dresses was made of 3-D printed epoxy, sanded and hand-sprayed. 

Another van Herben dress (at left) is strangely dark and highly textured. Its fabrication, fascinating. Cotton twill fabrics was hand-painted with polyurethane resin and iron filings, then hand-sculpted with magnets. 

Another dramatic haute couture dress by British designer Gareth Pugh was machine-sewn white sold-wool gazer with an overlay of white mesh and hand-embroidered with clear plastic drinking straws. Prefer one in black? He has one of those, too.

Alexander McQueen, 2014-15.

Feathers, pleats, lace, leather...and more

I almost had visual overload on the many ways feathers were incorporated into dresses and capes. One Alexander McQueen ensemble (2014-15) is covered with embroidered ostrich and goose feathers. 
Junya Watanabe, cape. 2015-16
And how about pleats? It's hard to outdo Spanish designer Mariano Fortuny for pleats and, yes there are several of his classics to behold. For modern interpretation, I was taken with the contemporary (2015-16) cape of machine-sewn gray wool and polyurethane jersey by Japanese designer Junya Watanabe.
Hussein Chalayan, "Duck dress." 2000.

Scissors are always at hand, but not in the way British designer Hussein Chalayan used them to create his prêt-à-porter "Duck" dress. He cut away shapeless bales of pink tulle fabric by hand until he had a female shape. Kind of like shaping boxwood hedges, I guess.

There is much, much more. If you can't get to the exhibition, consider purchasing the Manus x Machina catalog

And here are a few more dresses that I found particularly stunning.
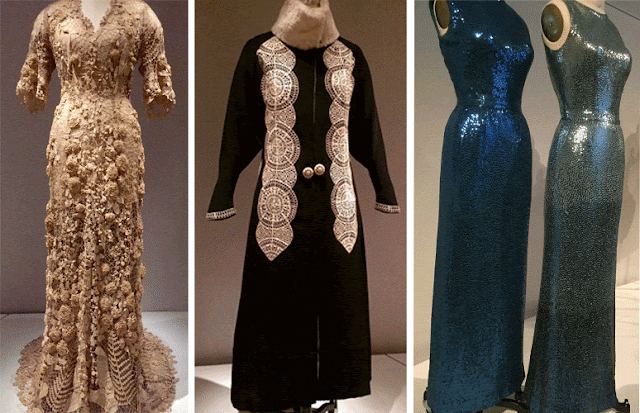
L-R: Irish crochet wedding dress, 1870. Paul Poiret.Coat-wool, leather. c.1919.
Norman Norell, evening dress. 1965 (prêt-à-porter)
 

L-R: Givenchy, 1963. Dior "Venus, 1949-50. (haute couture)
Alexander McQueen, 2012 (prêt-à-porter)

Tuesday, June 21, 2016

DIY yarn blocker

A real fiber find: An inexpensive and easy-to-store tool.

I like to work with light-weight yarns so I've been focusing on spinning single ply yarns. To set the twist to achieve a fairly balanced yarn, that is, one that maintains as little twist and doesn't want to twist back on itself, I've jerry-rigged a clothes line with weighted rods. For the most part, it worked, but it was how most jerry-rigged fixes are.

I hadn't considered making or buying anything more until I spied the pile of PVC pipes and connectors someone (Thank you, whoever you are!) had brought to the guild meeting. (Most guilds recycle equipment among its members for free, for sale or for a donation to the guild.) This was something I needed!

An instruction sheet accompanied the pieces and is attributed to Vonne Grunza who calls it a Yarn Blocker/Display Rack. I don't know if--or even how--she sold these and have been unable to locate her to ask. Whatever, it's a clever design--inexpensive, easy to make and  breaks down to store. Mine came in a long, narrow cotton bag and takes little space.

Last week's blog, which focused on my dyeing, brought a comment from Boud, who said, "That rack looks like something I would build from PVC pipe and connectors! To go with my niddy noddy and embroidery frame made that way!"

And she's absolutely right! A few pieces of 3/4 inch PVC plastic pipe and some connectors is all that's necessary. I made a couple modifications to the original plan by adding a crossbar to the base and a bit of glue to a few of the joints to add stability. (Thanks to M. for directing operations!) Most hardware stores have all the pieces. If you can't find pre-cut lengths, borrow or buy a PVC pipe cutter.


Do it yourself yarn blocker

Materials
  • PVC plastic pipe, 3/4 inch. 
    • Two 4:-ft lengths
    • Three 2-ft lengths
    • Four 1-ft lengths
  • Connectors (Numbered parts correspond to numbers on diagram)
    • (1) Four elbow connectors, 3/4"(upper crossbar and lower back crossbar)
    • (2) Two T-connectors, 3/4" (Connects two 1-ft lengths for sides of base)
    • (3) Two T-connectors, 1" arms/ 3/4" single (Larger 1" opening slides over the upright pipe.)
    • (4) Two 3/4" caps or in-line connectors (Stabilizes front of base)
    • PVC plastic glue, clear
  1. Glue is optional, but adds stability and when applied to only a few places, the blocker still breaks down for convenient storage. (Numbers and arrows point to glue points.)
    1. (G1) Glue elbows to each end of two of the 2-ft pipes. (Upper and back base crossbars)
    2. (G2) Glue ends of remaining 2-ft pipe into the 3/4" opening in the larger T-Connector. (Sliding crossbar)
    3. (G3) Glue one end of each 1-ft pipes into each of the 3/4" T-connector ends.  Make two. (Side bases)
    4. (G4) Glue a cap on one end of each side base. (Stabilizes base)
Yarn blocker parts and assembly diagram
To assemble:
  1. Connect a 2-ft length crossbar to each back end of the side bases.
  2. Insert a 4-ft pipe upright into each of the two T-connectors in the middle of the side bases.
  3. Put the upper crossbar and the sliding crossbar through yarn skein(s), slide the sliding crossbar onto both uprights and connect the upper crossbar.
  4. Weight the sliding crossbar as desired.

Tuesday, June 14, 2016

Spinning to dye for

After building up a sizable basket of handspun, it was time to dye. 

Most of my dyeing experience has been with natural dyes and I do love them--from the collecting through recycling nature's color-laden gifts to the lovely, soft colors. 

I've done my share of roadside collecting, but two things have spurred me to consider dye alternatives. One, most free and readily available dyestuffs--marigolds, walnut hulls, onion skins, etc.-- result in colors that dominate the yellow end of the color chart. And two, it may be fun, but it takes time. Precious time. 


As I'm focused primarily on wool fibers, I've puttered a bit with acid dyes but it's effect on the environment has been an ongoing concern. We live in a beautiful but fragile ecosystem--the Pinelands of New Jersey. We also have a septic system. 


Seeking a greener alternative

Dyed skeins drying
At the Maryland Sheep and Wool Festival last month, I came across Greener Shades dyes offered by Still River Mill in Eastford, Conn. As advertised, "Greener Shades is a non-hazardous, non-chrome, low impact, heavy metal-free acid dye for use on silk, wool, nylon, or any animal fiber. 

Formulated without the use of hazardous metals, these dyes provides superior light and wash fastness without relying on metal compounds to achieve bright and beautiful colors."

It seemed worth a try so I bought a starter kit. Then I proceeded to gather the tools and equipment needed to dye. My old stainless steel dyepot was long gone (It had been appropriated to make beer!). It's been replaced thanks to New Jersey Guild of Spinners and Weavers member Pat, who alerted guild members to cheap pots at a local discount store. pH paper was harder to come by--at least locally. After trips to four pharmacies and one medical supply store, I ordered it online, along with an inexpensive thermometer and citric acid. Oh, I also bought a burner.

Directions to use the Greener Shades dyes are simple, but I still needed to get into the rhythm of doing it. Perhaps most surprising to me was to discover that our well water is pH neutral! These dyes require an acidic pH of 4.5. Citric acid does the trick.

I dyed several batches over the weekend with depth of shade ratios ranging from 0.5% to 1% and played a little. That lovely soft mauve came from throwing a skein into the pot before all the amethyst dye had been discharged. It's the skein on the right in the photo and I like the effect.

Thanks also to the kind soul at the recent New Jersey Guild meeting who offered the yarn drying rack for a donation to the guild. It's perfect and I promise to share details about it (Click here for details.)

Friday, June 3, 2016

Spinning prep

Handcarding? Been there. Done that. 

Carded batts ready for spinning
If you've carded on hand carders, you know. It is time consuming. Yes, it's important to know how to do it and, yes, some people like the process of doing it. I like to do it for about five minutes. Then, I'm ready to move on.

To speed up my fiber prep, I bought a drum carder made by David Barnett in Sussex, UK long ago. It's a beauty! Shame on me that I let it languish for so number of years. I even gave it away, but with a string attached, so I didn't lose access. Although I've been spinning more than ever, I never expected to need to card wool again. Silly me.

It happened quite by accident. The last shorn ewe at Winter's Past Farm this spring was spectacular. (There is a photo in my blog.) Kris had given me first dibs on it, but I turned it down. However, when I mentioned it to a spinner friend, she offered to split the fleece with me. And now I have half a fleece so, yes, I'll be carding wool this summer.


Renewing a friendship

David Barnett drum carder
I remember buying the drum carder at a large wool show in  England, almost certainly during a study time with Mabel Ross, doyenne of spinning and author of The Essentials of Handspinnning and other spinning books. But it's been a while--a long while. Sadly, more detailed memory of using my drum carder is sketchy. 

After borrowing back the drum carder, I put some raw wool on the feeder tray and turned the handle. The drums rotated as they should but the belt skipped. Something was wrong, but I couldn't see it. How lucky I am to have a  resident mechanical detective. Maurice quickly.figured it out and now, after a good cleaning and some oil, it works perfectly. (We used light weight, non-petroleum-based Ballistol oil.)

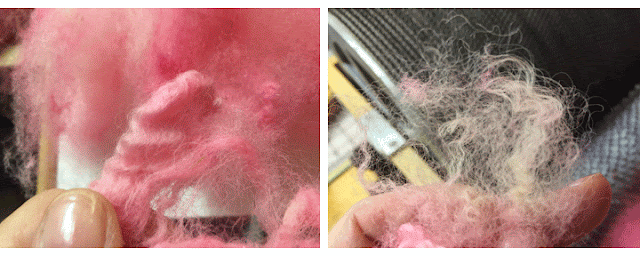
I wanted a little more intimate experience with it so I prepped some dyed Coopworth locks that were in my stash. I had a good laugh when I pulled out my 'dog comb' and found it labeled with the price. £1.95. Clearly it was not a near-recent purchase! 

I used the comb, which is shown in the lower right photo, to open up the tips of the locks and any other tight parts before putting it on the feeder. And now I have some lovely batts to spin.
Lock of fleece: Before and after combing open the tips of the locks.
Left, top: Carded wool on the drum                                                Right: Fiber ready for second pass into carder
Middle: wool on feeder tray ready for licker
Bottom: Unprepared locks